Showing posts with label recipes. Show all posts

Saturday, April 2, 2016

Lemon Meringue Pie

I need to give my mother credit for a majority of this recipe, as well as the pie crust. I'm not sure where she originally got it from, but she's been using it for years and I owe my love of pie making to her :)


Lemon curd:
1 1/2 c. sugar
4 T. cornstarch
3 T. flour
dash of salt
1 1/2 c. hot water

3 egg yolks
2 T. butter
1 t. lemon zest
1/3 c. lemon juice

Meringue:
5 egg whites
1/4 t. cream of tartar
6 T. sugar
1 t. vanilla

Photobucket>

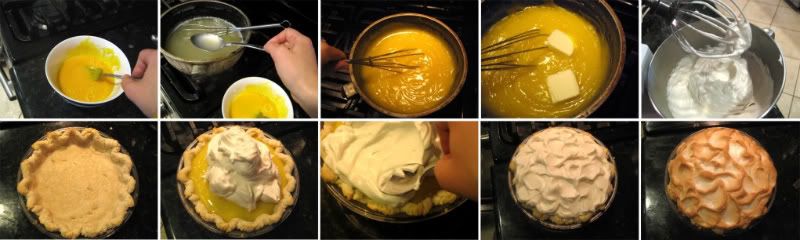
From my pie crust recipe (only use half because this is for one lemon meringue pie) cook the crust on 425 for 10-15 minutes, until edges are slightly golden. Before cooking you will need to fork the bottom of the crust a few times, and also either fill with pie beans or use a few pieces of foil to use as a form for the pie. The crust will collapse if there is nothing keeping it up around the edges.

For the Lemon Curd: In a saucepan, mix sugar, cornstarch, flour, and salt; gradually add hot water, stirring constantly, over high heat. Cook until mixture comes to a boil. Reduce heat; cook and stir 2 minutes longer. Remove from heat. Slightly beat egg yolks and stir a small amount of hot mixture into them. Add spoonful at a time of the hot mixture to the egg yolks, stirring the whole time. Now mix the egg yolk mixture into the hot mixture. Bring to a boil and cook for 2 more minutes, stirring constantly. Take off heat; add butter and lemon zest. Slowly add lemon juice, mixing well. Pour into cooked pastry shell.

For the Meringue: In a mixer, beat egg whites and cream of tartar until soft peaks from, about 5 minutes. Add sugar and beat until stiff peaks form. Add vanilla and mix until completely combined, just a few more seconds. Spread meringue over filling. Use a spoon to seal the meringue to the edge of the crust and to create a wave over the top. You don't want to have a peaks to high, because they could possibly burn.

Bake at 350 for about 15 minutes, until the meringue is golden brown. Check about midway through and make sure the tops of the meringue peaks are not getting too brown, if so, take down the temperature of the oven to about 320.


Pin It!

Wednesday, March 2, 2016

Dreamy Lemon Bars

Photobucket
Photobucket

Photobucket
This is a recipe that my family, friends
and I have used and loved for years;
hope you enjoy it!


Lemon Bars

Crust:
1 c. butter
½ c. powdered sugar
2 c. flour

Filling:
3 eggs
2 c. sugar
8 T. lemon juice
Zest from 1 lemon
4 T. flour
1 t. baking powder

Crust:

  • cream butter and sugar until light and fluffy, add flour
  • press into a 9x13 buttered pan
  • bake at 350 for 10-12 minutes, until slightly golden, not brown
Filling:
  • beat eggs, sugar, lemon juice, and zest completely; gradually add in flour and baking powder
  • pour over crust, bake at 350 for about 20 minutes; the edges should be golden not brown
  • let the bars sit for about 5 minutes, then sprinkle with powdered sugar, cut once cool
Kristin's Tips
  • The most important part of this recipe is cooking time, all ovens and pans are different, so it's really hard to tell someone how long to cook something; the best thing I can do is to tell you what to look for. Make sure when you're only cooking the crust that you don't let it get too dark (it will take away from the flavor if it cooks too long) and if its undercooked, they'll be harder to keep intact, and they'll be more gooey than anything. Same thing goes for when you're cooking the bars with the filling; you want a golden color around the edges, nothing too dark, or they'll be too stiff, and if undercooked, too gooey. Hope I've helped!
P.S. Yes you have seen this recipe before. I cheated a little by reposting it, but it's because I now have beautiful pictures and I had it posted to foodgawker. I hope you all have a wonderful weekend!!!!

Pin It!

Sunday, February 28, 2016

Lasagna

Photobucket


6 lasagna noodles (make 7 just to be on the safe side, we like a gluten-free version)
1 lb Italian sausage
1/2 lb ground turkey
1 small onion (chopped)
1 jar of tomato sauce
1 T. crushed red pepper
1 bunch of fresh basil (chopped)
1 bunch of spinach leaves (washed and without stems)
1 (16 ounce) container of cottage cheese
1 egg
1 16 ounce package of mozzarella cheese
1/2 c. grated parmesan cheese

Cook the lasagna noodles according to the package directions. In a large pan saute the sausage, turkey and onion. Cook the meat mixture thoroughly; I like to brown the meat quite a bit, but you just need to be sure it is cooked through. Add crushed red pepper and salt and pepper to taste. I like a lot of pepper, and if you like things spicy feel free to add more red pepper. With the heat off, add the tomato sauce (any kind will do, I don't usually like anything with garlic in my lasagna), I love Newman's anything; set aside. When the pasta is done, drain and set aside until ready to assemble. Mix the egg and cottage cheese together thoroughly. Grate both cheeses in the same bowl and mix, set aside.

Now to assemble. This is how I layer my lasagna from the bottom up...

tomato meat sauce (3 layers)
noodles (2 layers)
cottage cheese (2 layers)
mozzarella cheese mixture (3 layers)
basil (2 layers)
spinach (2 layers)
(repeat)

and to eliminate some of the pasta I do not do a final pasta layer,
I end with the tomato meat sauce
(I like to use big spinach leaves and lay them out flat, so it completely separates these layers)

Make sure to note how many layers of each you will need. You don't want to use all your cheese and then not have any for the top!

Bake at 350 for about 50 minutes (until all the edges are bubbling). Top with the rest of the cheese, and bake 5 more minutes or until melted. Let cook for 10 before serving.


Photobucket

Happy Cooking!

with love,
kristin ann :)


Pin It!

Monday, February 15, 2016

Wonderfully Raw Macaroons!


So, I will confess that this cookie is a 100 % knock off of the Wonderfully Raw Coco-Roons that I love oh so much, but are too pricey to buy in bulk.  Although my sweetheart of a husband said they were better :) I've been searching for a couple weeks with foodgawker/google/pinterest and other places for similar-looking recipes, and I think I found/created a winner.  I've only made them once (I stupidly made a huge batch so I couldn't justify make more the next day, even though I wanted to, just so I could make some tweaks to the recipe).  Obviously things can end up different depending on the brand of the ingredient you use, or your specific oven and things like that, so don't be made if it doesn't come out perfect :/

Raw Vanilla-Maple Macaroon

1 1/2 cups almond flour
3 cups coconut flakes (dried and unsweetened)
3/4 cup maple syrup (real maple syrup)
1/2 cup melted coconut oil
1 1/2 Tablespoons vanilla
1/2 teaspoon sea salt

Mix the dry ingredients (flour, coconut, and salt) thoroughly.  Add the wet ingredients (syrup, oil, and vanilla), and mix.  If for whatever reason it feels to dry to roll into a ball and stay intact, add a little more coconut, but this mix should work fine.
On cookie sheets lined with parchment paper I scooped/formed the cookies, using a small cookie scoop.  You could roll them if you want, if you don't have a scoop, but that made it the easiest for me.  The size of the cookie doesn't really matter, but you will have to change the cook time accordingly.  If you had a dehydrator, you could use that, which would make this cookie truly raw, but I don't.  One recipe I found that used a dehydrator said 8 hours, but it really just depends on how you want the cookie to turn out.  So try it out half way through!  I used my oven at 200 degrees, with the door open.  This took almost 2 hours.  Yes, this very simple recipe has a painfully long finish time.  I checked the cookies at the hour and a half mark to make sure they had not dried through the middle and the bottom was still quite moist (not easy to handle) so I let them stay in longer.

vanilla-maple coconut macaroons


DSC_1108

This recipe made about 2 dozen, maybe a little more (I forgot to count darnit).  You only need one pan because they don't expand, you can place them right next to each other.  Let them cool and store in an airtight container.  I didn't refrigerate them and they lasted just fine for a week.

Wonderfully Raw, has an amazing assortment of these cookies!  We've tried the lemon (my favs), vanilla-maple (martin's fav), and the chocolate brownie one (I'm not the biggest choco fan).  I'm trying the apple pie next!  You should try them first and then you really know how to create this perfect little cookie.  My next flavor to make will be lemon :)  This is the basic recipe so I would assume I'll use this and add to it.
Bob's Red Mill is the brand I use for most of my flours/grains and other things.  I buy my almond flour and coconut flakes in bulk on amazon :)  They really have everything, especially if you have to do gluten free, which I'm obviously going for.  We just love their gluten free pancake mix.

Pin It!

Friday, December 14, 2012

Gluten Free Peanut Butter Cookies

A while ago I posted this recipe for peanut butter cookies, it's my favorite, always turns out amazing.  THIS recipe is just the gluten free and slightly less processed version.  My goal is to make it completely unprocessed and more natural but I'm not completely there yet.  Surprisingly I didn't have to change the amounts of any ingredients, just simple substitutions, which was amazing! I might actually keep this healthy baking up now :)  So, all I did was sub Bob's Red Mill all purpose gluten free flour, for traditional all purpose flour, and organic coconut sugar for granulated sugar.  It wasn't much of a change, but gluten free!  My next step is substituting all the sugar, and switching out the butter for coconut oil.. next time!


gluten free peanut butter cookie

Gluten Free Peanut Butter Cookies

1/2 c. butter

1/2 c. brown sugar
1/2 c. organic coconut sugar (or regular sugar)
1/2 c. all natural peanut butter
1 T. honey
1 egg
1 1/2 c. Bob's Red Mill all purpose gluten free flour
3/4 t. aluminum free baking soda
1/4 t. salt

Cream butter and sugars till light and fluffy.  Add the peanut butter and honey, mix thoroughly.  

Add egg , make sure to scrape bottom of bowl, and continue to mix.  

Mix in flour, baking soda, and salt.

Use a cookie scoop or spoon, and then roll into 1 inch balls.

Use fork to make cross marks, dip fork in flour if it sticks to the dough.

Sprinkle the top with sugar (I used the coconut sugar).

Bake at 375 for 8-9 minutes.

Makes about 2 dozen.

I like my cookies soft and chewy, so I'm very careful about when I take them out of the oven.  The cookies will puff up slightly and start to gain a little color around the edges before ready to be taken out.

*Important side note: the dough should not stick to your hands.  You should be able to roll a ball without a mess, so if it's sticky, add a little more flour.   Reason that the recipe doesn't always have the same moisture levels include, size difference in eggs, temperature of butter, brand of flour, brand of peanut butter.. tons of things!  So just keep this in mind.


gluten free peanut butter cookies

Pin It!

Saturday, December 8, 2012

Chicken pot pie.. from leftovers! Oh and did I mention.. it's gluten free!

I love when we have leftovers and I can create a completely different meal with it!  It's just the best thing ever.  A few nights before this dinner I had baked a chicken, potatoes, broccoli and carrots, and we just had a whole bunch left.  I did end up adding a few extra things, just because.  Keep in mind this recipe is just estimated amounts of ingredients.  The point, is that you can use whatever vegetable/meat leftovers you have!  You might not be as excited as me, but this was a big deal for us at the murray house :)

gluten free chicken pot pie

Gluten Free Chicken Pot Pie
You can make the recipe with regular flour for the filling and crust, but because we have gluten issues at our house, we kick the gluten.

Filling:
2 cups chicken cooked and chopped
2 cups potatoes cooked and chopped (cubed)
2 cups broccoli steamed
1 medium white onion chopped
1 cup carrots chopped
1 cup celery chopped
oil or butter

In a large skillet I sauteed the onion, carrots, and celery with a little olive oil (if you don't already have cooked carrots).  Added salt, pepper, and seasonings to taste (I like rosemary, sage, and thyme).  Should take about 10-15 minutes to get everything soft and cooked through.  I had a large bowl with the already cooked chicken and broccoli, and added the freshly cooked vegetables to the mix.  You don't have to have any one of those ingredients.  So if you have potatoes, peas, and carrots, already cooked, just use those, and you skip a step.

Gravy/sauce:
4 Tablespoons butter (or oil)
1/4 cup brown rice flour (or regular ap flour if you don't do gluten free)
2 1/2 cups milk ( you can use chicken broth, but not quite as much)
Salt and season to taste

In the same pan, melt 4 tablespoons of butter (or you can use oil), and with a wooden spoon mix in the flour.  Over medium/low heat continue to stir this mixture in the pan, letting it sit occasionally.  I just like to make sure that the flour cooks a little bit.  Slowly add your milk to the pan while mixing.  A whisk works best, but I use a wooden spoon so I don't scratch my pans.  By slowly, I mean you only add a little bit, completely mix it in, and repeat.  This sauce isn't always going to turn out exactly the same, because it depends on how long you cook it at every stage, and at what temperature, also the kind of milk/broth you use.  So I never add all the liquid until I know what consistency I have and what I want.  I like my sauce a little thicker, so that the slice of pot pie holds better, while others don't mind the soupy consistency.  You can now salt and pepper to taste.  Then add to the bowl of your pot pie filling!  Mix lightly so that everything doesn't just mash up.

Crust:
1 1/2 cups gluten free flour (you can use ap flour)
1/2 teaspoon salt
1/2 cup coconut oil (you can use shortening)
about 6 Tablespoons of water
extra flour for rolling out

In a large bowl mix the flour and salt.  Add the coconut oil and with a fork, mix away!  This step takes a while, you can use a food processor or a hand pastry mixer to speed this up.  You want all clumps of flour/oil to be smaller than a pea.  Add the water slowly.  You may need more, you want the mix to completely hold together, enough to roll out, but not too wet that it sticks to your hands or cutting board.
Roll out dough just larger than your 9x13 pan.  After I rolled it out I place the pan on top, and cut out the shape of the crust so that it can lay just on top of the filling (but inside the sides of the pan).  Add the filling to a butter/oiled 9x13 pan.  Using your rolling pin, roll up your crust and unroll over the filling.  Don't worry too much about how perfectly it fits as long as it doesn't lay over the sides of the pan.  Make some kind of an air vent for the crust, by using a sharp knife.  I usually just do a line maybe 5 inches long down the center.

Bake at 375 for 40-50 minutes.  You want all the edges to bubble, and then you know it's heated through.  Let sit for at least 15 minutes before you serve.

gluten free chicken pot pie

*I had extra dough, so I cut out a few leaves and placed them on top of the crust, which is why you see so many layers and what not.  You could probably half this recipe to make it in an actual pie pan or a smaller corning ware type dish.  I actually made the 9x13 and a medium corning ware size dish because I had quite a bit of filling, and I just made more sauce/gravy for the extra dish.

Pin It!

Thursday, June 7, 2012

dinner!

Chicken Lettuce wraps! Made these the other night, and they were a hit! Love em! 


Recipe over here but really you can make them any way you want!  I made a side of brown rice, because it's delicious and much healthier than white rice, and put it in with the wrap.  Martin and Jen are quite the restaurant lovers, and even they approved this meal!  The mix I made can also be put over rice as a stir fry (or something like that).  Dinners at home - my fav!

with love, 
Kristin Ann :)

Pin It!

Friday, May 13, 2011

Makin Banana Pancakes :)

I love pancakes, it's a bit of a weakness actually. Generally in the morning though, I have a little more willpower than the rest of the day so I eat somewhat healthy, and if I have time to make breakfast, I try and stay away from gluten (since my poor tummy doesn't do well with it). So, long story short, I found red mill's gluten free mix, tried it, and loved it! So here you go..

Gluten free Banana Pancakes


How I make these wonderful things...
Follow the instructions for the pancakes on the package. Have ready (for one batch, which serves about 4, so 8 large pancakes)

2 bananas sliced in 1/4 inch ish rounds,
brown sugar, and
chopped pecans or walnuts if you are the nut type :) and also,
you can add ground flax meal to the top (not necessary, but we didn't have nuts, and I love flax)

On a skillet, griddle, pan, whatever you use to do pancakes normally, over medium heat, butter your pan and pour on 4 good size pancakes. Let cook for about a minute and then work quickly. Place between 5-7 banana slices on the top of each pancake and push in just slightly. I usually put one in the middle and do a circle around that, just for aesthetics. Sprinkle brown sugar with your fingers or spoon on top of the pancakes. Sprinkle, nuts, and or flax as well. Once you feel the bottom portion of the pancake is done.. flip! You will want to make sure your pan isn't too hot, burnt pancakes are just the worst. The sugar side can burn easily if it's too hot. Cook for a minute or two until you feel the pancake portion is done, not doughy, and that's it! If you can make pancakes, you can make banana pancakes. But if you tend to suck at pancakes, I don't really know what to tell you :) Good luck!
Also, you can use any pancake mix or recipe. I have a from scratch recipe I used to use before the gluten issues came up, and I can't find it, so I couldn't put it in the post.. but I'll find it one of these days.
Sprinkle with powdered sugar, drizzle with syrup, top with butter, go nuts! Add more fruit, whipped cream, however you love your pancakes.


Happy weekend breakfast everyone!


Here's the mix, in case you want to look into it. Red mill is an amazing brand for gluten free and just healthy products in general by the way. Most health food stores carry their line of products (stores like safeway only have a few things). We use red mill's pancake mix, quinoa, quinoa flour, oat flour, flax meal, etc. Locally, I know raley's has a large selection of their products, actually all of them.
Again, happy weekend!
with love,
kristin ann :)


Pin It!

Sunday, November 7, 2010

Baked Ziti.. and gluten free!

Since I've really wanted to make a point to cook gluten free I thought I might as well check out some pasta alternatives. I wasn't expecting much because I have not enjoyed most other gluten replacements, up until now. In my cooking I have never liked making substitutes. If you can't eat something, just don't eat it: this has been my philosophy until now at least. And usually it's because the alternatives aren't necessarily good for you, they're just alternatives. I bought some gluten free cookies the other day, and I eat them all the time, but they're just not as good as the original. And when you read the ingredients, it has I think 5 flour substitutes, and if I were baking it's just not worth the hassle.
Back to my dinner. I wanted to at least try another form of pasta, because I love pasta, and it makes for an easy and cheap dinner usually. On a few food sites I check out I have seen quinoapasta, and I thought, I'll try it. So I went to our local health food store (fremont natural foods, I think) and I wasn't impressed. I was hoping to see isles of glorious healthy food, and it is really more of a health supplement store, but they had a few food items. I found a bag of brown rice pasta, and decided to try it out. I love brown rice, it's always been one of my favorites, and so healthy! Anyways.. here's what I made :)


{top and bottom photos are the pre baked shots}

A Gluten-Free Healthy Baked Ziti

package of penne pasta (1 lb/16 ounces)
I used Tinkyada brown rice pasta
1/2 an onion, chopped
1 lb ground turkey
1 T. fennel seed
1 tsp. dry thyme or sage
salt and ground pepper to taste

1 1/2 c. sliced mushrooms
3 cloves of garlic minced
1 jar of marinara (any flavor or brand) they're usually 26 ounces
16 ounce container of low fat ricotta cheese
1 bunch of fresh basil leaves chopped
2 cups grated low fat mozzarella cheese

Cook pasta according to package instructions; rinse with cold water, drain, and set aside. In a large pan, saute the onion with a little olive oil, add ground turkey. Keep on medium heat, and continue to separate the meat into smaller pieces. Add fennel, and seasonings to taste. Cook until all meat looks seared and cooked through, about 10 minutes. Place the meat on a plate and set aside. In the same pan, over medium heat, add garlic and mushrooms with a drizzle of olive oil. Cook until golden brown, and add the marinara. Over low heat, stir the ricotta cheese into the mixture. Turn off the heat, but make sure that the cheese is completely mixed in, with no chunks. Add the basil to the marinara sauce, as well as the cooked turkey, and mix.

In a large baking dish (or a 9x13 pan) drizzle some olive oil to grease the pan. Add about half of your cooked pasta to the pan. Spoon or pour about half of the sauce over the pasta. Lightly toss the pasta and sauce. Continue to add the pasta and sauce until the pan is just about full. (I usually have a cup or two of pasta left over, which I refrigerate and use as a quick meal in the next few days). Make sure to add all remaining sauce. Add salt and fresh ground pepper to the top of the mix. Cover the pan with foil and bake at 350 for about 45 minutes or until the edges all begin to bubble. Remove foil and top with grated cheese, and bake for another 10 minutes.

And enjoy!


Why I used some of the ingredients..
brown rice pasta - gluten-free, full of fiber and nutrients
ground turkey - much healthier than your Italian sausage, but tastes great
fennel - it gives you a similar taste to the Italian sausage
low fat ricotta - tastes and feels almost identical to the original, and less saturated fat
low fat mozzarella - tastes and feels almost identical to the original, and less saturated fat

Feel free to use your everyday pasta, Italian sausage, and any cheese you would like. I just wanted to give you a healthy alternative to a classic Italian dish!

(Jonna I absolutely love the dishes you gave me!!)

Pin It!

Saturday, October 30, 2010

A little Halloween Fun

This idea has been my favorite new Halloween treat, at least the look of it. I bought everything for it, but didn't get to making it this week :( But if you're still having festivities tomorrow, it's a pretty easy treat!


Isn't it sooo cute! I found it here :)


You’ll need:

  • graham crackers
  • marshmallows
  • chocolate chips
  • yellow candy melts
  • candy corn

Directions:

  1. Cut one marshmallow in half and place both pieces on a large graham cracker (2 stuck together).
  2. Put a candy melt on top of the marshmallows.
  3. Heat in the microwave for about 2-5 seconds, just enough to make the marshmallows puff up, but not get too hot.
  4. Take out of microwave and add a chocolate chip on the yellow candy melt and the candy corn beak while the marshmallows and candy are still warm. Everything should stick together nicely.
  5. Let cool and serve! You can make these the night before a party and everything is still very tasty.


Last year I went around and found a whole bunch of halloween treat ideas, mostly cupcakes, and posted them here. There's a great pumpkin cake/cupcake recipe, and lots of easy ideas. Also, here, you can find a treat bag idea from Martha.
I hope you all have a very happy halloween.

with love,
kristin ann :)

Pin It!

Thursday, October 14, 2010

Lemon glazed angel food cake for my mama

Happy Birthday to Hootie :)
that's what we call her (hehe)


lemon angel food cake

Photobucket

Photobucket

For the angel food cake, I used a box mix and followed the instructions (and of course made sure to not over cook it).
For the glaze:
Juice from 2 lemons (about 6 T.)
6 T. melted butter
just a few drops of vanilla
1 c. powdered sugar
Mix the lemon juice butter and vanilla. Add powdered sugar, and mix thoroughly. I didn't thicken mine up as much as I should have, so depending on how you want it to look on the cake, and more or less powdered sugar. Pour the glaze along the top of the cake, it should drip down by it self. You can spoon more into areas that didn't get enough.
Garnish with candied lemon peel/zest.
I peel some of the lemon, sliced it thin, and put it in a saute pan with a little bit sugar. Once the sugar began to caramelize I took it off the heat and sprinkled more sugar over the top. I have no idea how you should really do it, maybe check out martha stewart's website :)

Pin It!

Friday, October 8, 2010

just a few fall dessert ideas...

I love fall, I know I've already told you. Everyday as the weather gets colder, I get happier. A lot of the food blogs and websites I look at are just filling up with fall recipes and ideas; so I thought I would share a few with you. Unfortunately, I'm on a cleansing diet this week. I meant to do one before school and fall began but kind of ran out of time. For me, I think it is very important to just clean out my system once in a while. No, they're not fun, but I usually feel so much better afterwards (I have a lot of random little health quirks). Sooo, as I am not allowed desserts for the next few days, I find ones to drool over. From my two favorite blogs, I found absolutely delicious looking and sounding apple cakes perfect for fall. Give them a try; let me know how they turn out.


Here we have an "Easy Apple Cake" from Bakerella. She's absolutely wonderful if you haven't looked at her blog before. Cake pops were kind of her invention and they're huge now. She was on martha stewart, and people are using cake pops and brownie pops and cheesecake and cake balls and they're just such a great idea. I have yet to try any, but I will soon. This apple cake will be my next endeavor. And it's easy!


From the kitchen of honey and jam; a carmel cake with apple filling. Yum right? This one doesn't look quite as easy. Since there are three parts; the cake, the filling, and the frosting; it make take a little more time, but I still think it's worth trying. I might try this at thanksgiving. Honey and Jam is another one of my favorite blogs. The photography is stunning and her recipes are also just as dreamy.

I hope everyone has a fabulous weekend. Mine will be full of homework and studying, but spent with my love, so still wonderful.

with love,
kristin ann


Pin It!

Friday, September 24, 2010

breakfast crazy

The fact of the matter is, I lOVE breakfast. I really do, just outright love everything about breakfast. I love eggs, I love ALL breakfast meats, I love pancakes and waffles in every flavor (even though I should stay away from gluten, they're still worth it to me), I love muffins, and doughnuts (oh how I LOVE doughnuts!), I love orange juice, and grapefruits, and cereal (I had cereal for lunch today), and fruit, and smoothies, and everything else that you could possibly incorporate with breakfast. I used to not like french toast, but I found a restaurant a few years ago that made it so divine (Maglebee's in Utah) that now I know a way that I even like french toast.
Well here was my breakfast today. I actually made just about the same thing yesterday, but better, but no camera, and no Martin. So today, because I didn't have school, and my amazing husband did. I got out of bed a little bit before he did, and I whipped this up. A breakfast burrito. I used to not love the idea of putting all my favorite things in a flour tortillas and having it for breakfast with salsa, but I got over that right quick (again, while living in Utah, thanks to the 24 hour Beto's). All these memories of Utah make me miss my sister. When I lived there for that short year, we ate together ALL the time. It was our favorite thing to do. Anyways, love you Jana.
So, here's how it went down.
  • first, microwave a medium potato (after washing and piercing) for about 5 minutes, unless you have a leftover baked potato from the night before, which work the best!
  • Next, cook your meat. I used a few strips of bacon and deli turkey. Cook the bacon first until almost crispy and set aside.
  • Then, get the eggs ready. For 2 burritos, I would use 4 eggs; crack and scramble in a separate bowl. Feel free to add salt and pepper as you go along, set aside.
  • In the same pan you cooked the bacon, or sausage, or steak, or whatever, saute the potato (after dicing in 1/2 inch cubes, with skin still on). This only takes a few minutes, if they look dry, add a drizzle of olive oil.
  • Add the meat (diced turkey, and crumbled bacon) and some hot sauce. I prefer tapatio. Once all is hot and incorporated, set aside.
  • In the same pan, cook your scrambled eggs. When the eggs are almost done (so still slightly runny) add a handful of cheese (small cubes, slices, shredded, whatever works) and once the cheese starts to melt, add the potato meat mixture.
  • And you're done!
  • You can heat up or cook the tortillas ahead of time if you would like.
  • Serve with cilantro, avocado, hot sauce, tomato slices, whatever you see fit.


Photobucket

Photobucket


Pin It!

Saturday, September 18, 2010

my breakfast.. a deliciously gourmet breakfast quesadilla

It's about 1 in the afternoon and I haven't had breakfast yet; this isn't weird for us because we wake up at 11.. yes, isn't our life amazing :) I'm in the kitchen and thinking to myself, eggs sound really good. We have eggs, cheese, lots of tomatoes, and some flour tortillas I recently purchased for a taco night. I then thought, well these tortillas are too small for a burrito, I'll figure something out. Martin was just on his way home from playing tennis so I knew he would be hungry, and I just started whipping things up. I prefer fried eggs, or sunny side up to scrambled, so I made 2 fried eggs, sliced up a golden tomato from the garden, found half of an avocado in the fridge from yesterday, and realized I had cilantro left from taco night as well. Long story short.. this is what I made. And it was delicious, and took just as long as any normal breakfast would take.


Photobucket

Photobucket

Photobucket

Photobucket

breakfast quesadilla:
2 fried eggs
1 medium size tortilla
1 sliced tomato
half an avocado
2 slices of cheddar cheese
sliced ham (or turkey lunchmeat)
cilantro
tapatio
salt and pepper

Have a wonderful weekend everyone :)

Pin It!

Monday, September 13, 2010

my breakfast.. a protein berry smoothie

Photobucket


This is an attempt to be healthy. I'm trying atleast :) Because my family is full of athletes and very weight conscious people I have developed a few habits that help me to be a little healthier. We eat at home a lot, which trust me, if you're trying to be healthier, is crucial, and we eat a lot of fruits and vegetables. The easiest and quickest meal I have, is a smoothie or shake. I like a milk base (it tastes so much better, and I believe in dairy, it's not for everyone though) to start out my smoothie. So in the blender I put about 3/4 cup of milk. Fruit is something I try to always keep on hand, but unfortunately most fruit doesn't last long. So, I freeze fruit that isn't used quickly, but usually only berries (strawberries, blueberries, raspberries, cranberries) because they freeze well. To the milk I add 1 1/2 cups of frozen/fresh berries, and a scoop of a chocolate protein mix. Unfortunately I don't have the brand or any information because I stole a bag from my parents, who bought in bulk (shhh). Most grocery stores now carry protein mixes, or a store like GNC. Blend until completely smooth; you may have to add a little more milk (or water) to the mix.
If you don't like the milk/protein style shake, do the same thing but use a juice base (apple is my favorite) and don't add the protein. I made on like this the other day and it was fabulous. Just like Jamba Juice (our favorite) but it's practically free, and no garbage, so you're helping your pocket and the environment, and yourself because it's so healthy!

Photobucket

Photobucket

Photobucket
In the last few months I have been trying to eat more "raw" foods. A lot of my health issues can be easily cured just by making some adjustments in my diet, and this has been not that easy. But this is an easy way to get a 100 % raw meal (if you do just the bare fruit juice smoothie), and it feels substantial. Anyways, food for thought.
Enjoy your day!
with love,
kristin ann :)

Pin It!

Friday, September 3, 2010

sauteed mushrooms

Use as a side to a chinese inspired dish, or serve as an appetizer with crostini. If you use button mushrooms you can serve with toothpicks.

Photobucket

Ingredients:

3 large portobellos
olive oil for cooking
2 cloves of garlic (minced)
1 small pepper (your choice, minced)
2 T. soy sauce
1 T. oyster sauce

In a large saute pan drizzle in some olive oil and add garlic. After about a minute on medium heat, throw in the mushrooms and minced pepper. It only takes a few minutes too cook mushrooms, you may need to add a little more olive oil, as mushrooms tend to soak it up. Add the soy and oyster sauce and cook for another few minutes. And done.
You can garnish with chives or green onions.

Photobucket

Pin It!

Thursday, September 2, 2010

Chicken Lettuce Wraps

I've been meaning to spend a little more time in the kitchen, so tonight, that's what I did. I kind of created this recipe a few years ago because I just LOVE lettuce wraps. We make Chinese type dishes at my house all the time, so I figured I could do it, and to be honest, it was pretty easy.
Use it as an appetizer or a meal, serve it with rice. Feel free to substitute any item, it will still turn out, I promise. We do a lot of stir fry dishes at our house, so we have things like oyster sauce, and sesame seed oil on hand, it's not necessary, just adds more character. You can find them at any grocery store.


Photobucket

Photobucket

Photobucket

Photobucket

Ingredients:
2 chicken breasts (thawed)
2 T. minced garlic (2 large cloves)
1 c. chopped carrots
1 c. chopped zucchini
1 can of sliced water chestnuts, chopped
olive oil for cooking
3 T. soy sauce
drizzle of sesame seed oil
about 2 T. oyster sauce
salt and pepper to taste
sriracha if you like it spicy
1 head of butter lettuce
Slice chicken into 1/4 inch strips and then chop into tiny pieces. In a medium saute pan, on a medium heat, saute garlic and chicken with a bit of olive oil. Cook for about 5 minutes, and add the carrots. Continue to stir on medium heat, after a few minutes and the carrots have gained some color, add the zucchini and water chestnuts. Cook for about 5 more minutes. Now add the soy sauce, sesame seed oil and oyster sauce. Continue to stir over heat for another minute or so. Add salt and pepper to test. Let cool for a few minutes; and spoon into individual lettuce leaves.

Pin It!

Tuesday, August 24, 2010

I know.. I've gone cupcake crazy

But... I have one more to show you! During all the birthday mania this last week or so, I threw this one into the mix, because I know britney wanted chocolate frosting, and I know she loves junior mints :)

Photobucket

Photobucket


Also, I made up a simple chocolate buttercream recipe.

the easy choco buttercream:
1/2 c. butter
1/2 c. shortening
1/2 c. cocoa powder
2 c. powdered sugar
1 t. vanilla
1-3 T. milk

Cream the butter and shortening in a mixer. Add the cocoa powder and mix until the lumps have completely smoothed out. Add the powdered sugar and mix completely. The mix will be dry, but continue to mix to ensure that the powdered sugar and butter mixture are combined (make sure to scrap down the edges). Add the vanilla and 1 Tablespoon of milk. Mix thoroughly. Continue adding milk a Tablespoon at a time until the desired texture is reached.
Keep refrigerated until about an hour before use. If it's too warm it won't hold a form, if it's too firm it makes it more difficult to pipe.
Use sprinkles and candy to decorate!
(I'm sorry if this recipe doesn't turn out perfect. I don't always keep track of what I'm putting in a mixing bowl! Just taste test along the way and you'll be fine.)

Pin It!

Thursday, August 5, 2010

Lasagna!

This delicious lasagna was given to us by Martin's grandmother. I know, I didn't make it, so I should be allowed to post it, but I just have to. It was delicious lasagna, and gluten free! Lately my issues with gluten have been getting worse and worse, and I crave it more and more. If I stayed at home and cooked for myself it would be that bad, but you just can't get away from it. Well, lasagna is a meal that both my husband and I absolutely love and our creative grandparents made a gluten free option for us. Oddly enough, it wasn't with the intention of being gluten free or for me, they just happened to have a whole bunch of left over zucchini (given to them by us because of our abundance of zucchini) and so it was used as a substitute for the pasta. Great idea! I have no recipe for you, but I will create one soon!

Photobucket

Pin It!

Monday, July 26, 2010

Happy Birthday Husband

Martin had a birthday this weekend! We have had such a great week and it is only going to get better. We spent a day in Santa Cruz at the beach and downtown with Jen for day one of his birthday celebration. Then we spent a day and a night in Monterey, which was one of the best days I think either of us have ever had. We drove up early in the morning and kayaked the Elkhorn Slough which starts at the mouth of the bay, but you kayak up and around marshlands were seals, otters, jellyfish, birds and lots of wildlife is all around. It was amazing, I'll say that. Then we went to the aquarium, which I haven't done since I was little, and spent the evening in the honeymoon suite at the Colton Inn (an adorable bed and breakfast). Today we leave for the Russian river and will not be back until next Sunday, we can't wait!
For the cake, which I forgot the night of the Santa Cruz day, I had a little surprise party planned for Martin at my parents house just so I could have the opportunity to make him a cake, which was a Reese's peanut butter cake! I haven't done too much with peanut butter so this was an experiment for me. I found a similar cake to the one I made so I visually based the cake on that, and then I looked around for a peanut butter buttercream, and decided to whip up my own. It was delicious! I recommend it!

Photobucket

peanut butter reese's cake

peanut butter reese's cake


Peanut Butter Buttercream
(this is for one basic cake mix)

3/4 c. peanut butter
1/2 c. butter (1 cube)
3 c. powdered sugar
1/4 c. milk
1 T. vanilla
1/2 c. cream

Cream the peanut butter and butter until light and fluffy. Add powdered sugar and beat until the powdered sugar is completely combined and there are no lumps. Add the milk 1 tablespoon at a time while mixing until all milk is in. Mix in vanilla. You can just add milk until the desired texture is reached if you prefer to not use cream, or if you don't have any on hand. But the cream gives it more rich and cohesive consistency. Mix for 1 to 2 minutes. Add sifted powdered sugar to thicken the frosting or add more milk to thin.


Chocolate Ganache

1 bag of semi sweet or milk chocolate chips
1 1/2 cups of cream

You can mix the two ingredients of a double boiler, until chocolate is completely combined and then for about 2 more minutes over the heat with a whisk, or use a microwave. In a glass bowl add both ingredients. Heat for about 1 minute, and whisk. Heat for another 30 seconds and mix. Keep heating and mixing until chocolate has melted completely. Make sure to whisk thoroughly at every break.
If the ganache is for a filling, which I did use for one layer, you will want to refrigerate it before use. If the ganache is to pour over the top, you will want it at about room temperature.

Pin It!